Homemade Potato gnocchi. An Italian staple and also such an easy recipe to prepare!
Potato gnocchi are light, fluffy and creamy. They can be enjoyed with so many different sauces, even if my favorite one is the easiest one: tomato sauce.
Gnocchi are a great baby & toddler recipe as they are very tender and can be enjoyed since the beginning. If you are following the baby led weaning method I would suggest to poke one gnocco at the time with a baby fork and let your baby proceed from there. With my boys I had two baby forks “loaded” with food at the same time so that they could eat but also explore food. You can always let them eat with their hands, but get ready for some mess to clean.
Let me show you how you can prepare a lovely homemade gnocchi meal for your family in no time.
The first thing to do is to boil the potatoes. Wash them (do not peel them!) and place them in a pot with abundant cold water. Turn the heat on and set the timer to 30 minutes from when the water will start boiling. The potatoes are cooked if you will be easily able to insert a fork in the center.
Drain the potatoes and let them cool down for 10 minutes.
Prepare your working station. You will need a flat non sticky surface ( I have a stone kitchen countertop). Measure the flour in a bowl, remove the egg from the fridge.
Insert one potato at the time in a potato ricer and mash them one after the other on the flat surface. You will obtain a lovely potato mountain. Make a hole in the center with your fingers and crack the egg inside. Add 1 tsp of sea salt and a few tablespoons of flour. With our hands start working the ingredients together adding the flour a bit at the time. In a few minutes you will obtain an elastic, a bit sticky dough. That’s it. Do not overwork the dough and do not add more flour than needed. Place the dough on a plate, wash your hands, clean the surface and get ready to roll the gnocchi.
Dust the surface with the extra flour, cut the dough in quarts. Roll one quart into a cylinder. If the cylinder is too long, cut it. With your hands roll it into a one inch diameter cylinder (more or less, it doesn’t need to be precise). Cut small 1 inch pieces, those are your gnocchi. DONE!
Use the extra flour to keep dusting the surface so that the rolling phase will be easy. Do not use more.
Place the gnocchi on a surface dusted with four so that they will not stick.
Heat a large pot 3/4 full with water. When the water is boiling add 1 tablespoon of sea salt. Add the gnocchi, in batches. I divided the quantity I prepared in 4 batches. The gnocchi will naturally sink at the bottom of the pot and after 2/3 minutes you will see them raising up at the surface. That’s the time to scoop them out with a spider strainer/slotted spoon, basically any ladle with small holes will work!
Transfer the gnocchi in a large bowl and keep cooking them.
While the water was heating up, before boiling the gnocchi, I prepared my tomato sauce.
Turn the heat on to medium and in a saucepan heat the olive oil and the garlic for 1/2 minutes. When the garlic is nicely golden add the tomato sauce, adjust with 1/2 teaspoon of sea salt and reduce the heat to a simmer. Cook for around 5 minutes up until the sauce thickens. Always taste the sauce. If it’s too acidic, simply add a splash of milk. If it’s too liquid, keep cooking it for a few more minutes. Turn the heat off and add few fresh basil leaves. By the time the sauce is ready your water to cook the gnocchi will be ready.
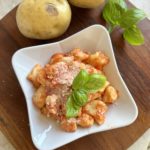
Assemble everything adding the sauce to the cooked gnocchi. Sprinkle some grated parmesan cheese on top and serve warm. They are delicious!
MORE POTATO RECIPES
- How to make a kid-friendly Green Beans and Potato Casserole
- Sweet Potato Pear Puree +6M
- Chickpeas Potato Curry Soup +9M Vegan – Baby Food & Spices
- Avocado & Sweet Potato & Spinach Baby Puree’ – Powerful First Food Recipe +6M
- Turkey Squash Red Potato baby puree’ +6M Iron boosting
- Sweet Potato Fries with Avocado Aioli
- Super Pink Soft Beets & Potato Gnocchi
WHICH KIND OF POTATO SHOULD I USE?
The best potatoes for gnocchi are the white or yellow ones. The more starchy and old, the better. Yes, old potatoes are perfect for gnocchi, the wrinkled ones you wanted to trow away. Old potatoes have less water than new ones, that means you will need less flour to create the dough.
CAN THE RECIPE BE GLUTEN FREE?
This recipe can easily be switched to gluten free simply using a gluten free flour instead of all-purpose. 1:1 ratio.
DO NOT USE MORE FLOUR THAN SUGGESTED
This is important. In order to have fluffy and light gnocchi, don’t use too much flour. I know that when working the sticky dough you might be tempted to use more flour, but that will result in hard and chewy gnocchi. The flour should be 20/25% max of the potato amount. Plus an additional 5% that you will use to dust the surface when rolling the gnocchi. That will take you to a flour quantity that is max 30% of the potato quantity.
NO NEED TO PEEL THE POTATOES!
Peeling boiling hot potatoes is tricky and not fun. Well, you don’t need to peel them!
Do not peel the potato before boiling them or they will get too watery.
Do not peel the potato after boiling them, the potato ricer will do it for you. The peel will not go through the holes. Once mashed, open the lid and you will see that the peel is attached to it. Simply remove it and keep going with the next potato.
- 800 gr. potatoes
- 1 medium egg
- 180 gr. all purpose flour for the dough
- 4 Tbsp all purpose flour to dust the surface
- 1 tsp sea salt
- 3 Tbsp olive oil
- 1.5 cups tomato sauce
- 0.5 tsp sea salt
- 4 basil leaves
- 2 cloves garlic, peeled, cut in half (to be removed once the sauce is cooked)
-
Wash the potatoes and boil them in abundant cold water.
Do not peel them.
Set the timer to 30 minutes from when the water will start boiling.
The potatoes are cooked if you will be easily able to insert a fork in the center.
Drain the potatoes and let them cool down for 10 minutes.
-
Mash the potatoes with a potato ricer on a flat surface. The peel will automatically stay in the potato ricer chamber, it will not go through the holes.
-
Make a hole in the center of the potato mountain and crack the egg inside. Add 1 tsp of sea salt and a few tablespoons of flour. With your hands start working the ingredients together adding the flour a bit at the time. In a few minutes you will obtain an elastic, a bit sticky, dough. Do not overwork the dough and do not add more flour than needed. Place the dough on a plate, wash your hands, clean the surface and get ready to roll the gnocchi.
-
Dust a flat surface with the extra flour, cut the dough in quarts. Roll one quart into a cylinder. If the cylinder is too long, cut it. With your hands roll it into a one inch diameter cylinder (more or less, it doesn't need to be precise). Cut small 1 inch pieces, those are your gnocchi. DONE!
Use the extra flour to keep dusting the surface so that the rolling phase will be easy. Do not use more.
-
Place the gnocchi on a surface dusted with four so that they will not stick.
-
Heat a large pot 3/4 full with water. When the water is boiling add 1 tablespoon of sea salt. Add the gnocchi, in batches. I divided the quantity I prepared in 4 batches. The gnocchi will naturally sink at the bottom of the pot and after 2/3 minutes you will see them raising up at the surface. That's the time to scoop them out with a spider strainer/slotted spoon, basically any ladle with small holes will work! Transfer the gnocchi in a large bowl and add your favorite sauce.
-
Heat the olive oil and the garlic for 1-2 minutes in a saucepan.
-
When the garlic is nicely golden add the tomato sauce, adjust with 1/2 teaspoon of sea salt and reduce the heat to a simmer.
-
Cook for around 5 minutes up until the sauce thickens. Always taste the sauce. If it's too acidic, simply add a splash of milk. If it's too liquid, keep cooking it for a few more minutes. Turn the heat off and add few fresh basil leaves. By the time the sauce is ready your water to cook the gnocchi will be ready.
-
Assemble everything adding the sauce to the cooked gnocchi. Sprinkle some grated parmesan cheese on top and serve warm.
No Comments
Did you make this recipe? Share the love, tag @buonapappa on Instagram and hashtag it #buonapappa I would love to see your creations!